Oil changes, the first and most important part of maintenance for your engine this section will give you a step by step on how to change it, when, and with what.
I'm all about saving money, but there may be some tools you'll need to buy for this. I've provided links to a few good solutions(depending on your vehicle) to help you out. Amazon is a great tool to save yourself some cash over going to your local stores.
- Jack and jack stands - Torin T82001 2 Ton Trolley Jack with Stand
- Basic mechanics tool set - Stanley STMT71654 201-Piece Mechanics Tool Set
- Wheel Chocks - RhinoGear 11930 Tire Hugger Wheel Chock - Set of 2
- Drain pan - The Plastics Group W78 Drain Pan And Container
- Engine oil and filter(will vary by vehicle!) - Pennzoil Platinum Full Synthetic 5W-20 Motor Oil - 6 Quarts
Let's start at the beginning, how do we know WHEN to even change our oil?
Traditionally, this is done every 3,000 miles or 3 months but as the times are changing and cars are becoming far more efficient as well as the oils that we're putting into them this is going to change. Some newer cars are doing 5, 7, or even 10,000 miles before they need changed! The best place to check this is going to be your owners manual. Your owners manual is going to be your go-to guide for most of the maintenance intervals you have and specifications for your car. Now not everyone has the luxury of buying brand new cars so they may not have one with theirs and in this case your best bet is to call your local dealership and ask them. They have all this information straight into their systems and can let you know when you change it, what kind of oil, and how much.
Now that we have determined we do in fact need an oil change, what do we do next?
First we need to head off to our local auto-parts store (Advance Auto is my personal favorite here) and pick up our supplies. This should be relatively easy as you can just tell them the information about your car and they can send you in the right direction. You'll want to make sure you pick up the appropriate amount of oil for the car as well as the correct filter, brand and quality are up to you. Remember though, your oil is there to protect the most vital part of your car...so I try to avoid cheaping out on this part. I don't always go with the highest grade filter as their isn't really a huge difference in them all anyways, but I'm a fan of synthetics and synthetic blends of some name brand or another depending on the current sales...Valvoline being my favorite, although Pennzoil has a good name behind it and is usually fairly inexpensive even for synthetic.
So now we are at home with our supplies, what do we do with it?!
Let's go ahead and pop the hood so we can locate some main parts. First locate your oil cap, typically right on top of the motor fairly easy to find, usually with a nice little picture of an oil can on it and some oil specs sometimes to go with it.

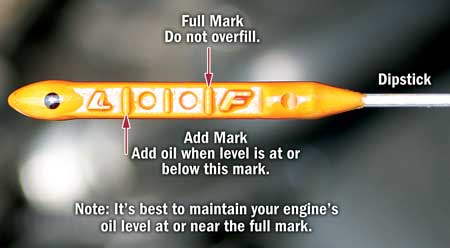
Next you need to make sure you know where the dipstick is so we can check it after we're done, usually a bright color you may have to search a little but it will also usually be labeled with a nice picture on it.

After you've found them both go ahead and remove the oil cap and pull the dipstick out some, this will help the oil drain a little easier. We are going to assume you have a typical canister type oil filter and it'll be underneath the car for this one so you're all done up top.
Now we are going to go ahead and jack the car up and support it on a jack stand or 2 if you'd like to lift the whole front end. First off go ahead and put your wheel chocks behind the back wheels to make sure it doesn't roll out. Next you're going to want to locate your lift points, typically behind the front tires on the pinch welds is easiest but if you refer to your lovely owners manual it will have a section showing you where to jack it up by. After you jack it up always always ALWAYS! support it with a jack stand. A floor jack is not meant to hold a car up for an extended period of time and may fail if you try and do so!
Now lets go ahead and crawl on under and see what we have. If you look up you should be able to tell where the motor is and on the very bottom is our oil pan. On the lowest part of this should be a bolt that will be used as the drain plug which is where we will drain the fluid out from. Before you do that though take a look around, not too far from there should be the oil filter....now some of these are tough to find if you aren't familiar with them so take a minute to make sure you know where it's at before you start the process.
Now that we have everything located go ahead and figure out what size you need for the plug. I prefer to use a wrench for these as it makes it a lot harder to strip the plug out when using the 6 point closed end. Put your wrench on and break her loose enough to turn with your fingers. If it's coming out very rough you may have a problem with the threads and might want to take it to a professional, if it strips it out a lot of times you have to replace the pan which isn't quite as easy as this! After it's loose enough position your drain pan underneath it keeping in mind the oil will drain outwards from the plug not straight down. Carefully spin it out of the rest of the way by hand and when it gets towards the end try and spin it from above so you don't get oil all over your fingers. Keep in mind if you just drove this car it will be very hot so be careful or wait for it to cool down!
After you have your oil draining wait for that to finish and position the pan underneath the oil filter itself. This you should be able to get off by hand and do the same thing, slowly twist it off and try to avoid getting too messy....as difficult as some cars make that. After that's done draining take a look at where it came off from and make sure there's no residue or the old gasket on the surface of the motor. If so, clean it off or pull the gasket off. After you have that done pull out your new filter. Open up the oil and put a little bit on your finger to lubricate the gasket all the way around and then spin it on. This doesn't need to be terribly tight just a turn or 2 after the gasket touches. Make sure your oil drain plug is clean and put that back in tightening it up by hand....you don't need to over tighten this, there's no pressure on it so snug plus half a turn is enough here as most call for between 15-30 ft lbs.
With that you should be all done under the car and go ahead and pick it up off the jack stand and slowly let it down off the jack. Add however much oil the vehicle calls for keeping in mind the containers typically have measurements on the side if you need a half quart etc.. After you add the oil put the oil cap on and start her up for just about 15-30 seconds and shut the car back off. Take a peak underneath and make sure nothing leaked out, and then check your oil. Make sure you pull the dipstick and wipe it off with a rag and then put it back down in fully, remove, and then check. It usually has a range and as long as you're in the middle and not too high or low you're good to go!
Put the dipstick back in, close the hood fully and remove those wheel chocks and you're done with your first oil change! I usually set my tripodometer to keep track of when I'm going to need another one, but if you have a better memory than I do you won't even need that!
Usually doing this yourself can get you a full synthetic oil change for $25 depending on what type of oil you buy while some places charge up to $75-80 for one!
Quick tips for your to check while you have your hood up:
Air filter - these are pretty easy to find and replace. Usually a black "accordion" type hose leading to a black box, open her up and see if she looks dirty. If so, replace it and increase your fuel economy!
Washer fluid - Usually labeled with a picture of a windshield with water spraying up on a blue cap this is a good time to top this off as well.
Belts/Hoses - Belts and hoses are all made of rubber and of course when they get old they crack and deteriorate. Take a look at any of them you can see and see if they look frail or like they're cracking or falling apart. If so, you might want to take it to a mechanic(or read one of my future articles ;)) to have this fixed before it fails.
All other fluids - Most of them have a dipstick and it never checks to hurt to see if it's low. Most are labeled, coolant, power steering fluid may have a picture of a steering wheel, transmission fluid (check while warm/running) and things like this. Figuring out these are low may point to another issue to be fixed and could save you a lot of money and inconvenience in the future!
Wiper Blades - This is a quick and easy one to change and inspect. Look for any visible damage on the blades and if it's present, replace! This consists of tears, bends, breaks and deformation. You can also replace these if they are streaking as this is a sign they're just about done for.
Thanks for reading, if you have any suggestions for a DIY article you'd like to see, leave it in the comments!
No comments:
Post a Comment